
| 일 | 월 | 화 | 수 | 목 | 금 | 토 |
|---|---|---|---|---|---|---|
| 1 | 2 | 3 | ||||
| 4 | 5 | 6 | 7 | 8 | 9 | 10 |
| 11 | 12 | 13 | 14 | 15 | 16 | 17 |
| 18 | 19 | 20 | 21 | 22 | 23 | 24 |
| 25 | 26 | 27 | 28 | 29 | 30 | 31 |
- 안드로이드 스튜디오
- 태스크정리
- 안드로이드스튜디오
- Parcelable 인터페이스
- Android 클릭이벤트
- 클릭중복방지
- 개발자
- Android
- Kong돌이
- 안드로이드액티비티간데이터통신
- Android 클릭추상화
- 안드로이드 싱글
- 권한추가
- android studio
- 오류해결
- 안드로이드원클릭
- 해시키 추출
- Toast
- 액티비티간 데이터전달
- 인터넷권한
- 자바
- Android Studio Parcelable
- 네이티브 키
- 이클립스
- 카카오로그인API
- boolean getBooleanExtra()
- 프로세스와 태스크
- 로그인API연동
- 카카오 로그인 구현하기
- 안드로이드
- Today
- Total
Kong돌이의 코딩이야기
Android Studio 버튼 클릭 시 부분화면 추가하기 (Inflater 활용) 예제 본문
안녕하세요 오늘은 LayoutInflater을 활용해서 버튼을 클릭 시 부분 화면 추가하기 예제를 만들어볼 텐데요
시작해보겠습니다.!!

다음과 같이 레이아웃을 구성해주세요 어려우신 분들을 위해 밑에 소스코드 올려드리겠습니다!!
activity_main.xml 코드입니다!! 여기서 중요한 점은 버튼의 아이디와 마지막 LinearLayout의 아이디를 지정해주세요!!
<LinearLayout xmlns:android="http://schemas.android.com/apk/res/android"
xmlns:app="http://schemas.android.com/apk/res-auto"
xmlns:tools="http://schemas.android.com/tools"
android:layout_width="match_parent"
android:layout_height="match_parent"
android:orientation="vertical"
tools:context=". MainActivity">
<TextView
android:layout_width="match_parent"
android:layout_height="wrap_content"
android:text="버튼을 눌러 부분 화면을 추가하세요" />
<Button
android:id="@+id/button"
android:layout_width="match_parent"
android:layout_height="wrap_content"
android:text="추가하기" />
<LinearLayout
android:id="@+id/container" <----------여기 중요합니다!!
android:layout_width="match_parent"
android:layout_height="match_parent"
android:orientation="vertical"></LinearLayout>
</LinearLayout>
이제 버튼을 눌렀을 때 새로운 XML 레이아웃을 메모리에 객체화하여 안쪽 리니어 레이아웃 (제가 중요하다는 곳)에 나타내도록 한번 만들어볼 거예요 그러기 위해선 객체화할 XML레이아웃도 하나 만들어야겠죠?? 따라 해 주세요~
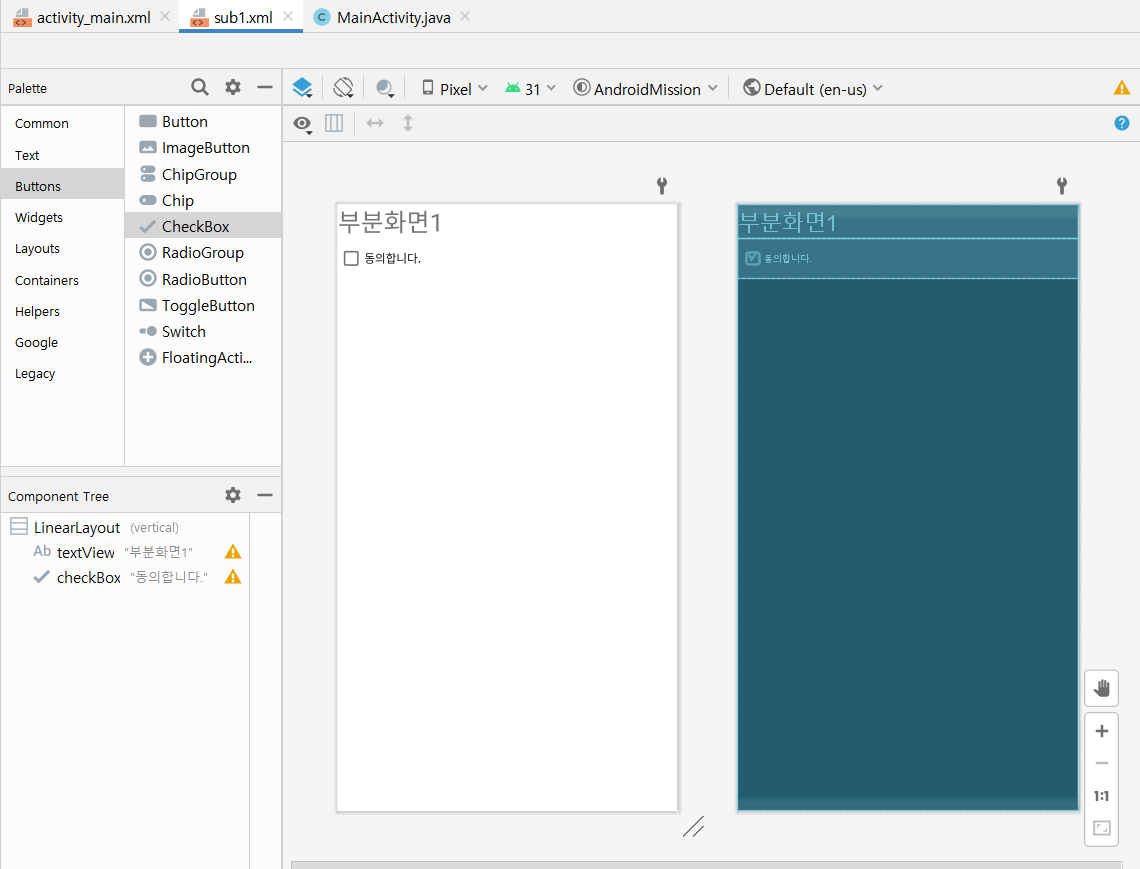
res 경로에서 저는 새로운 레이아웃 파일만 하나 만들어줬습니다. 파일 이름은 sub1.xml이고요 화면 구성은 이렇게 해주시면 됩니다!! 밑에 소스코드 올려드릴게요!!
<LinearLayout xmlns:android="http://schemas.android.com/apk/res/android"
android:orientation="vertical"
android:layout_width="match_parent"
android:layout_height="match_parent">
<TextView
android:id="@+id/textView"
android:layout_width="match_parent"
android:layout_height="wrap_content"
android:text="부분 화면 1"
android:textSize="30dp"/>
<CheckBox
android:id="@+id/checkBox"
android:layout_width="match_parent"
android:layout_height="wrap_content"
android:text="동의합니다." />
</LinearLayout>
자 이렇게 activity_main.xml , sub1.xml 파일 이렇게 하나하나 레이아웃 구성을 해보았습니다.
이제 제일 중요한 소스를 작성하러 가봅시다!!

소스 코드는 정말 간단한데요 설명은 코드와 함께 해드리겠습니다!!
public class MainActivity extends AppCompatActivity {
// 부분 화면 추가하기
LinearLayout container;
Button button;
@Override
protected void onCreate(Bundle savedInstanceState) {
super.onCreate(savedInstanceState);
setContentView(R.layout.activity_main);
container = findViewById(R.id.container); // 메인 xml에 빈 컨테이너
button = findViewById(R.id.button);
button.setOnClickListener(new View.OnClickListener() { // 버튼에 대한 원클릭 이벤트를 줍니다!
@Override
public void onClick(View view) {
LayoutInflater inflater = (LayoutInflater)
// 레이아웃 인플레이터를 활용하여 인플레이터 객체를 생성해줍니다
getSystemService(Context.LAYOUT_INFLATER_SERVICE);
// 겟 시스템 서비스를 메서드를 활용하여 레이아웃 인플레이터 객체를 참조한 후 사용합니다.
inflater.inflate(R.layout.sub1, container, true);
// inflater.inflate(내가 만든 레이아웃, 내가 만든 레이아웃이 들어갈 곳, true) 파라미터는 이렇게 설정해주고 이러한 과정을 통해 부분 레이아웃(sub1.xml)에 정의된 뷰들이 메모리에 로딩되며 객체화 과정을 거치게 됩니다!
CheckBox checkBox = container.findViewById(R.id.checkBox); // sub1.xml에 있던 체크박스에 대한 접근
checkBox.setText("로딩이 되었습니다."); // 로딩이 끝나면 set.Text를 이용하여 텍스트를 전환시켜줍니다.
}
});
}
}
자 이제 한번 실행해 볼까요??
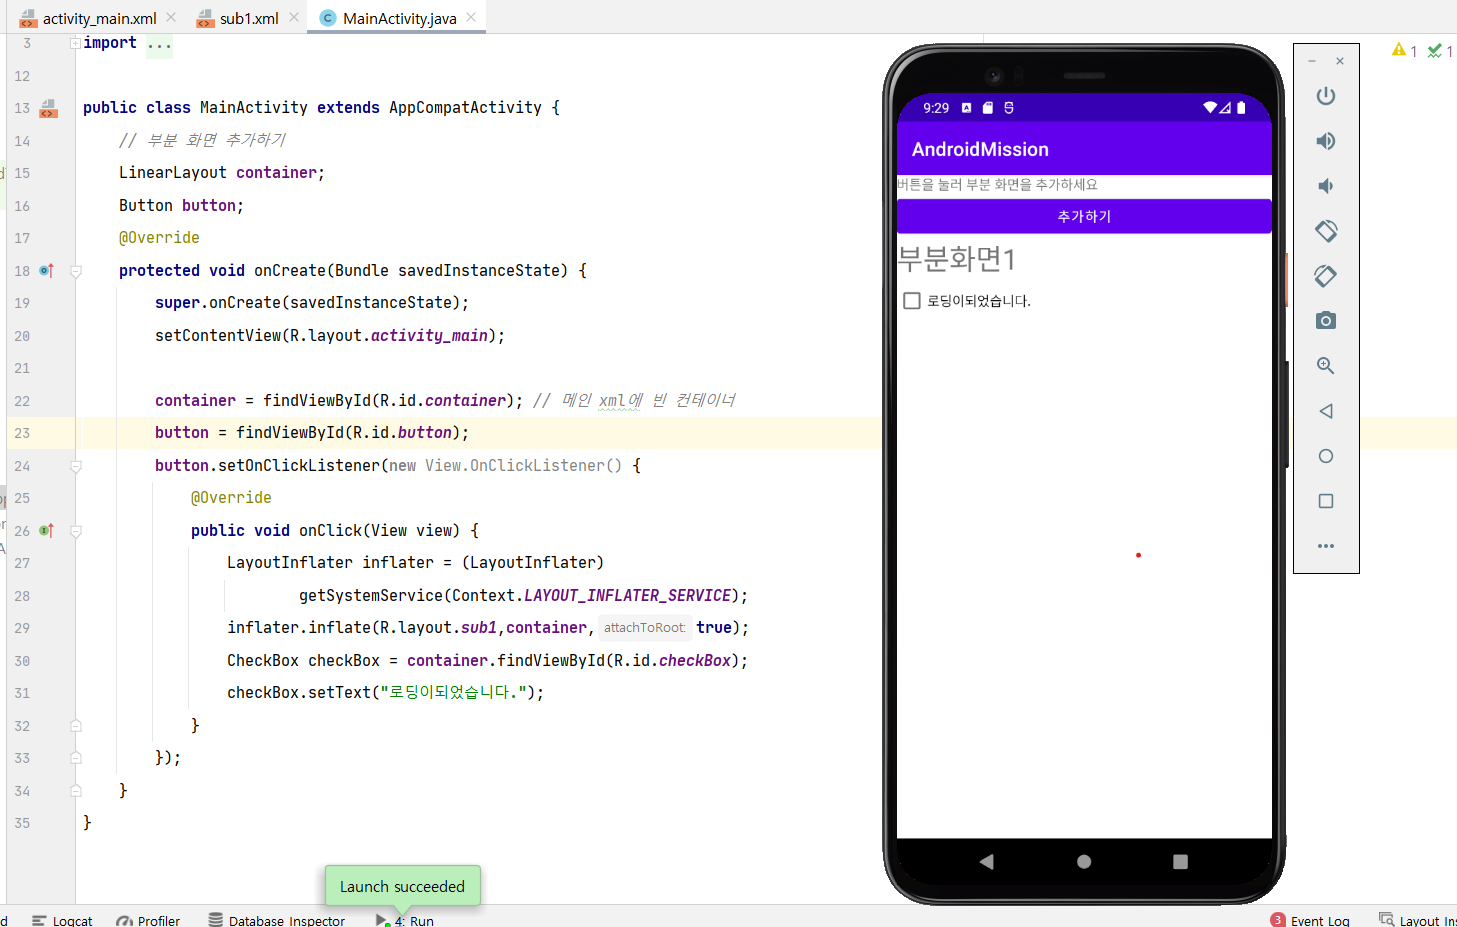
자 이렇게 activity_main.xml에 구성되어 있던 아이디가 @+id/container이었던 리니어 레이아웃 부분에 부분 화면1이라는 텍스트와 체크박스가 생성이 되었습니다. 부분화면추가는 이런식으로 활용하면 되겠습니다. 하는 도중 오류와 궁금하신 점들이 있다면 댓글에 작성해주세요!! 이상으로 Android Studio 버튼 클릭 시 부분화면 추가하기 (Inflater 활용) 예제를 마치도록 하겠습니다!
'코딩이야기 > 안드로이드' 카테고리의 다른 글
| Android Studio 인텐트의 기본구성요소 알아보기 (명시적,암시적 인텐트) 정리 (0) | 2021.08.26 |
|---|---|
| Android Studio startActivityForResilt 메서드 활용예제 (0) | 2021.08.25 |
| Android Studio 프로그레스바 사용 예제 (0) | 2021.08.24 |
| Android Studio 알림 대화상자(Dialog) 만들기 예제 (0) | 2021.08.23 |
| Android Studio 스낵바(Snackbar) 보여주기 예제 (0) | 2021.08.23 |


